

Jane at Want It, Need It Quilt! asked me to contribute a block for her Desperate Housewife Sampler Quilt-along. After wrestling briefly with the "housewife" thing, I took out my curlers and started working on a design. I'm calling it the Lazy Susan. The block finishes at 8" square.

If you've been following Jane's quilt along, I know Jane's Phillips Screwdriver block only whetted your appetite for pieced curves. So lets get started!

Materials:
4 coordinating 5"x5" fabric squares
1 contrasting 7.5"x 7.5" fabric square
Step 1

Step 2

Arrange the small squares "randomly," ensuring that one of each print appears in the center four-patch. I was also careful that the directional prints pointed in all directions. What you don't want is to have 3 matching pieces lined up, and the fourth on its side. Sew four rows of four, then sew the rows together, keeping the seams aligned. I'll call this the background fabric.
Step 3

A note on piecing circles:
The finished diameter of the inner pieced circle is 4-1/2", or a 2-1/4" radius. I find pieced curves with a radius less than 3" to be difficult. Below I describe the technique i used to assemble this block. You might also consider Dale Fleming's 6-minute circle technique.
To follow my process, mark the center of the contrast square and cut a 4" diameter circle. I used an Olfa circle cutter, but you can use a template if you like.
Or download a pdf with the four circles used in this block. Be sure to set Scaling to None in the print dialog box, and it's always a good idea to double check with a ruler after you print. You will cut one of each of the four circles.

Note: I don't recommend cutting the outer circle yet (NOT LIKE the picture). Cut only the inner 4" circle at this time.
Step 4

Mark the compass points on the edge of the circle in eight places. I do this by folding the circle in half along the grain line, then half again. Finger press at the folds. This will give you N, S, E, W.

Unfold so you see the half circle again, then fold the sides to meet in the center. Finger press the two new folds at the edge of the circle. This gives you NE, NW, SE, SW.
Step 5

Cut a ring out of the background fabric, outer circle first. Place the compass point at the center seam intersection, or align the template crosshairs with the middle seams. Cut a six-inch circle. Take the central circle and cut a 5-inch circle. Discard the 1/2" ring.
Step 6

Take a deep breath. It's time to sew a circle.Set your circle of background fabric right-side-up on the table. Now set the contrasting circle on top, right-side-up, aligning your compass points with the seams and points of the background fabric. Starting at the north point, flip the outer edge of the contrast fabric towards the center of the background circle so that the press mark on the contrast fabric meets the corresponding seam or point. Pin the fabrics right-sides together. Rotate 90 degrees and repeat for east, south, and west.
Now match points and pin for NE, NW, SE and SW. And finally pin two additional times between each of the eight compass points.
Step 7
Sew your circle! Think of each distance between two pins as one short straight seam. Go slowly and be very careful to maintain a 1/4" seam allowance. As you get to each pin, leave the needle down and gently realign the fabric to avoid puckers. You may want to lift the presser foot when you do this. Be patient with yourself -- this will be slow going.

Here's my finished circle. Examine your finished circle. Because any errors will distort the entire block, you'll want to correct any problems now.
Common Problems and Solutions
- If you caught any puckers or the seam allowances are out of alignment in a section, unpick a few stitches, repin and resew that segment, carefully backstitching at the beginning and end. Next time, use more pins and/or readjust the fabric more frequently as you sew the seam.
- If the block puffs up in the middle your seam allowances are too narrow.
- If the block pinches in on the edges, your seam allowances are too wide.
- If a section of seam is too wide or too narrow, but the seam allowances are properly lined up, resew that section but don't unpick the bad seam until you're done.
As it happened, I let my seam get too wide in a couple places, so I did some reworking to get it right.
Clip around the edge of the seam about 1/8", spacing every half inch or so. Press towards the center. Hurray, the hard circle is done! (smaller=harder)
Step 8

Using circle cutter or template, cut a 7" circle around the assembled center piece. (I could have gotten away with being less precise on the center circle seam if I had waited to cut the outer circle until now.)
Mark the compass points along the edge of the contrast ring as before. Place your pieces together and decide how you want to orient the center circle.
Step 9

Time for he final circle seam! Align the pieces as before, with the 7" center piece on point and right-side-up on the table, and the 6" background hole right-side-up on top of that. Flip the outer edges and pin, pin, pin.
Step 10

Sew 24 short seams.
Step 11

Examine your work. I found a pucker at one of the background seams...

...and fixed it. Clip and press the seam to the inside.

And your done!
Clip around the edge of the seam about 1/8", spacing every half inch or so. Press towards the center. Hurray, the hard circle is done! (smaller=harder)
Step 8

Using circle cutter or template, cut a 7" circle around the assembled center piece. (I could have gotten away with being less precise on the center circle seam if I had waited to cut the outer circle until now.)
Mark the compass points along the edge of the contrast ring as before. Place your pieces together and decide how you want to orient the center circle.
Step 9

Time for he final circle seam! Align the pieces as before, with the 7" center piece on point and right-side-up on the table, and the 6" background hole right-side-up on top of that. Flip the outer edges and pin, pin, pin.
Step 10

Sew 24 short seams.
Step 11
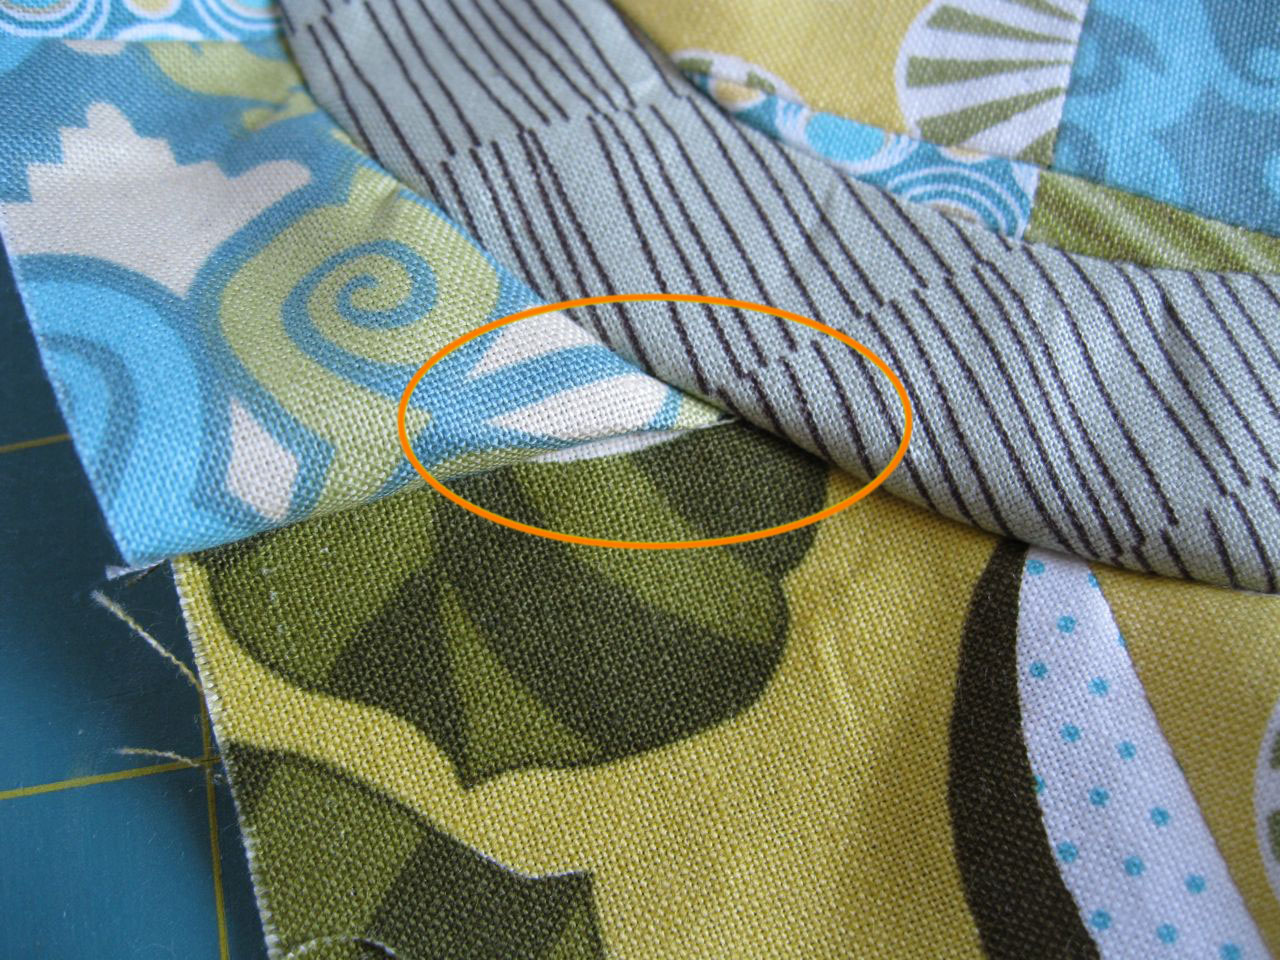
Examine your work. I found a pucker at one of the background seams...

...and fixed it. Clip and press the seam to the inside.

And your done!
You are a pro-star at circles/arcs/curves! I must try one some day... But not today!
ReplyDeleteLove your Lazy Susan block!
That is wonderful even I think that circle and curve could became a desperate matter! But I guess it looks more tricky than it is - so I want to try this!
ReplyDeleteThank you for a great block and good tutorial!
Teje
Thank you Dan. What a wonderful and very informative tutorial. Curves are fun and easy - a challenge that every housewife can conquer one day.
ReplyDeletecool block!
ReplyDeleteand you make it seems really easy to do!
Lovely! Awesome tutorial.
ReplyDeleteAwesome...and timely! I've got a swap project to make and I was thinking insert circles...but nothing was "wow-ing" me...until now. Thanks Dan - you're my hero!
ReplyDeleteImpressive!
ReplyDeleteYowzers
ReplyDeleteThis looks great! I love your individual blocks. You said you're not really the sampler type, but yours would be amazing if you ever changed your mind. :)
ReplyDeleteThis is a great post thanks
ReplyDeleteI love the idea of a Lazy Susan quilting block.
ReplyDelete