19 July 2013

Yoga bag

Hamish is on a yoga kick lately, but sadly lacks appropriate yoga lifestyle accessories. So I set about making a bag for his yoga mat.


I picked a handsome Parson Gray canvas print and studied up on free patterns and tutorials. Nothing matched my vision exactly, but several tutorials had helpful bits and pieces.


There are three open pockets on the outside of the bag around the base. The bag and pockets are lined with quilting-weight cotton.


The inner lining has a small pattern-matched envelope pocket for storing cash and keys.


It was a fun project, and came together more quickly than I expected. The final closure at the top where the zipper, strap, shell & lining come together was a bit tricky – I don't have a lot of bag making experience – but a bit of hand stitching did the job.

The three sources I found the most helpful were Amy Butler's free Nigella pattern for proportions and outer pocket, Modest Maven's tutorial for zipper and inner envelope pocket, and Jane's Girl Designs tutorial for another take on inserting a zipper.

12 July 2013

NYC MOD Double Wedding Ring Challenge + Giveaway

The NYC MOD quilters have partnered with EZ Quilting/Simplicity, Interweave and Juki to sponsor the Double Wedding Ring Quilt Challenge! Use the Double wedding ring template/or pattern to create a project, then enter it to win amazing prizes!


I'll be making my first DWR quilt for this challenge using my red and neutral over-dyed fabrics from the last post. I pieced my first four arcs.


Challenge Categories:

  • SMALL - ONE RING: 20″ or smaller. This is a great way to play and learn your curves, and try your own version of making this fun design.
  • TRADITIONAL: 4 rings or larger. Make the traditional double wedding pattern by using the template and your choice of fabrics…not straying to far from the traditional style.
  • MODERN: 4 rings or larger. How can you interpret the double wedding ring, put a MODERN spin on a traditional design? Piece it, applique, fuse, whole cloth? Possibilities are endless! 
For all categories, quilts must be made of three layers and bound.

The EZ Double Wedding Ring templates are available at www.simplicity.com or at your local store. You don’t have to use Darlene’s Double Wedding Ring templates to enter, but we’d sure like it if you did! Any double Wedding ring template will work.

The judges for the challenge are Darlene Zimmerman ( EZ quilting), Vivika DeNegre (Interweave), Lisa Mason(president of NYC MOD), Victoria Findlay Wolfe(Quiltcon Winner, with Double Edged Love), and Elisa Albury.

The deadline for entries in December 1, 2013. You can enter up to three times, one project in each category, any project you have started this year. Enter at the following pages:
Small
Traditional
Modern

Prize Categories:

1. Grand Prize from any of the 3 categories
2. One winner from Small
3. One winner from Traditional
4. One winner from Modern
5. Judges Choice

Grand Prize:

  • Photo of the Grand Prize project in EZ/Simplicity advertisement in Modern Patchwork Magazine,
  • Complete collection of EZ Templates by Darlene Zimmerman, Deluxe sidewinder and Deluxe Bias Tape and Quilt Binding Machine
  • Juki HZL Exceed F600 Sewing Machine
  • Featured in an article in Spring issue of Modern Patchwork 2014
  • 15 Minutes of Play
  • FQ bundles of Robert Kaufman Kona cotton & Darlene Zimmerman collection

Additional prizes for all other categories will include:

  • EZ Quilting Templates and Notions
  • Special gift from Modern Patchwork
  • 15 Minutes of Play by Victoria Findlay Wolfe
  • One year Membership from The Quilt Alliance
  • Oliso Irons 3 small traditional and modern
  • Gutterman Thread (In-home Cabinet) 100 spools, 100 m, 100% cotton
  • $50 Gift Certificate to Canton Village Quilt Works
  • Gift Certificate from Fabric Depot online store
  • American Spirit by Fairfield queen-sized
  • FQ bundles of Robert Kaufman Kona cotton & Darlene Zimmerman collection
  • Fabric Bundles by New Castle Fabric
  • Fabric Bundles by Fabric Traditions
  • Darlene’s latest quilt
  • The Spray and Fix Sewing Adhesive Collection by ODIF USA traditional
  • A FREE class at Craftsy.com
  • Joy of Quilting by Kathy Doughty, Material Obsession
Winners will be announced Dec 15th, 2013. Winning quilts with need to be sent in by January 1st.

Blog hop Schedule:

July 8th
​NYC MOD​ Quilters (http://nycmetromodquilters.blogspot.com)
Interweave (quiltingdaily.com)

July 9th
Emily Bailey (emsscrapbag.blogspot.com)
Shelly Pagliai (http://prairiemoonquilts.com)

July 10th
Amy Ellis (amyscreativeside.com)
Faith Jones (www.freshlemonsquilts.com)

July 11th
Amy Smart (http://www.diaryofaquilter.com)

July 12th
Dan Rouse (hi!)
Elisa Albury (www.stitchoutsidetheditch.com)

July 13
Jenny Cameron (Fiberlosophy.blogspot.com)

July 14th
Jane Davidson (http://quiltjane.blogspot.com)

July 15th
Joanna Wilczynska (http://shape-moth.blogspot.com)
Jackie Kunkel (http://cvquiltworks.blogspot.com)

July 16th
Kathy Doughty (http://www.materialobsession.typepad.com)
Juki (http://jukihomesewing.wordpress.com)

July 17th
Lisa Mason (http://theredheadedmermaid.blogspot.com)
Flaun Cline (http://ipleadquilty.blogspot.com)

July 18
Pat Sloan (http://blog.patsloan.com)
Jessica Alexandrakis (http://lifeunderquilts.blogspot.com)

July 19th
Jacquie Gering (http://tallgrassprairiestudio.blogspot.com)
Lee Heinrich (http://www.freshlypieced.com)
Monica Solorio-Snow (http://thehappyzombie.com/blog)

Giveaway!

I've been given a set of EZ Double Wedding Ring templates to give away to one lucky reader. Please leave one comment on this post for your chance to win. I'll pick a random comment next week.

26 June 2013

Fiber reactive dye for a tea-stain effect

I'm starting a quilt project with prints in a range of reds, and a range of off-whites and tans, but I had a hard time finding fabrics with compatible color tone. I want all the fabrics to have an aged, muted tone, like they were all French General prints (fabrics printed by Moda with an aged, French countryside personality), even if the prints are not all French General fussy.

The first thing that came to mind was Penny Sew Take a Hike's tea-stained Scrappy Trips quilt. The tea stain softens the chaotic colors and unifies the composition. So off to the internet I went, searching for information on colorfastness. Alas, I couldn't find anything that made me feel confident that the color would persist through washings. And though it seems very abstract compared to color-fastness, several people were worried that the tannic acids in tea would damage the fabric in the long term.

The final fabric pull, including many over-dyed prints.

I set about searching for permanent dye solutions, and found several very helpful sources. First, I came upon a post by Deborah Schlegel at Art Threads about using Ecru fiber-reactive dye to stain a cotton sweater. Next I found an old Flickr discussion prompted by Rossie Hutchinson culminating in a experiment to find the best fiber-reactive color for tea-stain effect. Of the three she tested, Rossie also preferred Ecru. Voila - a plan!


I pulled out all my fabrics with true whites -- mostly red prints, but many off-whites too -- and set about dyeing in batches. I adapted Dharma Trading's instructions for tub dyeing, using a 5-gallon bucket, 4 gallons of water, 4 cups salt, 2 Tbs Ecru dye, and 1/2 cup soda ash to dye about 2 lbs of fabric (~6 yards). That's too much fabric for that volume of water if you need completely even color, but I was open to some mottling. I did have some unexpected results, but more on that later.

My first surprise was that although I pre-washed every scrap, some fabrics sucked up the dye color, and some hardly took a sip. I did a total of three dye batches, and a few of the fabrics went through all three. Here are a few of the dyed reds next to undyed yardage. The Julie Comstock Junk Drawer print was dyed twice, and the Sweetwater Tangled Threads just once.


And here are some tans. The Metro Circles and Oval Elements prints received two batches of dye because I want them not just dingy but dark. But the fancy Japanese woven (second from bottom) was only in the dye bath a few minutes before I pulled it out, and let the others stir and soak for another half hour.


But the biggest surprise came in the color tone of a few dyed fabrics. These three prints were in the same dye bath. All were dyed primarily to reduce contrast between the print and the background, mitigate the yellow, and perhaps add some mottling. But the colors came out so differently! The keys and the birds look great, but the foliage print is so orange -- where did that come from?


I wonder if certain fabric is more receptive to a specific component in the dye, or perhaps some components of the dye are absorbed and removed from solution more quickly, leaving scraps on the inside of the fabric pile to fight for what's left when they're stirred free. Who knows? I'm sure that orange fabric is not going to be in this quilt, but I think I'll use the original.

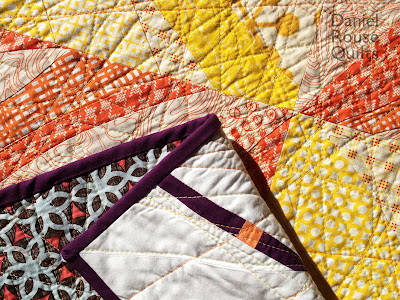
I'll leave you with photos of the final 40 or so of each color. Not the greatest photos, but I love how the fabric turned out.


What do you know about tea staining, and dyeing for tea-stained effect? I'd love to hear.

28 May 2013

Camp Stitchalot

Won't you join me on a quilting retreat this summer? I'll be teaching at Camp Stitchalot in Ann Arbor this August 9-11, hosted by Pink Castle Fabrics. There will also be three more amazing teachers: Jacquie Gering (Tallgrass Prairie Studio), Amanda Jean Nyberg (Crazy Mom Quilts), and Rossie Hutchinson (Fresh Modern Quilts).


I'll be teaching curved piecing techniques, starting with curved improv. This is the 20" block I made for the retreat sample quilt. The idea for the retreat is we'll have focused instruction time with each teacher, then mentored studio time to explore the new techniques individually and together.


Brenda and Rossie sent out four solids to each of the teachers, with instructions to stick to the palette so all our blocks would work together for the sample quilt. Not very good at following directions, I added four additional fabrics in equal measure, including two prints, naturally. Hopefully it won't get me in too much trouble.


I love quilts where improv and traditional precise piecing bump into each other, and that's what I was exploring in this block. I used the same approach in my recent Sunrise and Orb quilts.


I'll have more photos and discussion soon of the quilt beneath the block in this photo. It's another use of improv curved piecing, here in a (perhaps) more approachable rectangular setting.

I can't tell you how much I'm looking forward to Summer Camp Stitchalot. Brenda's (Just a Bit Frayed) spring retreat came off as a mad success. You can read full reports, including descriptions of the idyllic rural B&B venue, from Katy Ginger Monkey Jones here and here, and more from Rossie Hutchinson here.

Hope to see you at camp!

22 May 2013

Happy Harvey Milk Day

Today is Harvey Milk Day in California, honoring the birth date of one of my heroes in the struggle for lesbian, gay, bisexual and transgender rights. We've come so far in the last couple years -- it's hard to imagine the challenges Harvey faced when he won public office as an openly gay man.

Harvey Milk. Photo by permission of Daniel Nicoletta
Two years ago I started a portrait quilt of Harvey Milk, based on this famous photo by Daniel Nicoletta.  I finished in June 2011.


Nicoletta's photo was taken during his campaign for City Supervisor, and his campaign button is prominently displayed on his chest.


We've made so much progress, and there is still so much to do. Thank you for your support in the fight for full equality.

20 May 2013

Another Sunrise

It's actually the same Sunrise quilt from a few weeks ago, but I'm revisiting to enter the quilt into Amy Ellis's Blogger's Quilt Festival in the Baby Quilts category. The baby blanket is machine pieced and quilted, and measures 44" x 45".


I quilted horizontal lines in various shades of orange and yellow, with the lines across the center of the blanket more dense and more orange than the sides.


For the density of the the quilting, the blanket drapes beautifully and has a remarkably soft hand


If you have a moment, check out all the great festival quilts.

AmysCreativeSide.com

19 May 2013

Orb final, including quilting notes

I finished the binding on the Orb quilt the other day using the same hibiscus purple that appears in strips on the quilt top, only without the orange bits. The final dimensions are 51" x 51".


And I had some helpers for taking photos yesterday.


I'm still quite happy with the quilting on this one.


I emptied several spools of orange and yellow thread.


Several people have asked how I went about the quilting. The short answer is I marked each straight line using various colors of Frixion pens and quilted with a walking foot. Lots and lots of lines.


1. I started by marking (but not sewing) the locations of the circles. I used two small bowls as circle templates.
2. Then I marked a first set of tangent lines -- about three tangent lines for each circle, with each line touching two circles. I quilted the lines with a medium orange thread.
3. I repeated Step 2 several times using progressively lighter oranges, then yellows.
4. When I got to my lightest thread color, I focused on the circles one by one, marking and then quilting lines so there were no large gaps/angles between the tangent lines. Each 2-1/2" circle has about 25 tangent lines, and each 3-1/2" circle has about 30 lines.

The final step was to add a few lines at the edges and corners where the quilting lines were farther apart than in the center of the quilt.

I was nervous about using the Frixion pens, but I'm very happy with how it turned out. My favorite color was bright pink. It was visible on the light and dark colors, but not super ugly like the dark blue and black. After quilting I washed and blocked the quilt. Most of the pen marks washed away, and the few that remained disappeared completely when ironed. And there aren't any white ghost marks on the dark fabrics, as some have experienced. Perhaps ironing before an initial wash can set the ink medium, even as the pigment disappears? I have no idea, but I'm very happy with how this particular process worked.

I've entered the quilt in the Home Machine Quilted category of Amy Ellis's Bloggers Quilt Festival.

AmysCreativeSide.com

05 May 2013

Orb quilted

In spite of fighting a nasty cold most of this week I managed to quilt the Orb. This is the second quilt from the improv curved piecing I started several weeks ago. The first is the Sunrise quilt.


The quilting is all straight lines in shades of yellow and orange. The lines go every which way, but meet to form circles at tangent intersections.


I marked the lines with various shades of Pilot Frixion pens. The ink disappears when you iron -- I haven't had a chance to iron yet.


The light was so beautiful yesterday evening, I had to take some photos.


And the shadows do a pretty good job of hiding the Frixion marks.


I backed the quilt with a Ty Pennington print. I was surprised to see a few of the quilting circles framed the print in ways that seemed fussy and intentional.


I'll bind the quilt with the purple solid -- hopefully this week.


30 April 2013

Munchkin projects

Last week I spent a lot of time sewing for and with my son. He's working on a Women's History Month research project for his 5th grade class. Each kid was assigned a notable historical figure to learn about. The final output of the project is a "place setting" with all the items in the place setting -- the plate, cup, fork, etc. -- representing something about the famous woman. The objects are not literal representations of what you would find on a dinner table, but abstract artistic interpretations.


Munchkin's subject is Eleanor Roosevelt, first lady of the United States from 1933-1945, delegate to the United Nations, and architect of the U.N. Universal Declaration of Human Rights. For his "plate" Munchkin chose to sew a baby blanket to show that Eleanor was born with the courage of her convictions.

He searched for an appropriate symbol for courage, and chose the Tabono (oars), an Adinkra textile symbol from West Africa. The symbol represents confidence, strength and perseverance.


Munchkin has used a sewing machine in craft class, but this is the first time he's asked me to teach him. I put on the binding, but he did everything else, including selecting the fabrics, cutting and sewing, drawing and applying a fusible webbing template, basting the quilt sandwich, and quilting. It turned out great. I love that he chose a textile symbol, and the fact that it's from Africa reflects Eleanor Roosevelt's internationalist vision.

Last week's other project was a pillow for Munchkin to take to 5th grade science camp this week. He wanted the word "camp" and an Angry Birds pig. He loves those pigs.


I imitated one of Chawn's lettering styles.


The pig pattern is from Le Borse di Gaya via Fandom in Stitches. I enlarged the template 150% and added pieced pupils to the eyes.


And yesterday morning I sent him off to camp. I know he'll have an amazing time, and I can't wait to hear about his experience when I pick him up Friday afternoon.

22 April 2013

Sunrise quilt


I  finished a small quilt with those improv-pieced drunkard's path units I wrote about a couple weeks ago. The arcs are set in solid white, symmetrical on one axis, and a bit off center on the other axis.


I quilted horizontal straight lines using 8 or so shades of orange, gold, and yellow. I quilted the first lines on a longarm machine, then filled in on my domestic sewing machine.


The quilting lines are darkest and densest through the center of the quilt -- about 1/8" apart. Further out the lines are spaced 1/4" to 3/8", and the thread color is paler.


The bias binding is a diagonal cross hatch print (with a snip of blue on one side of the quilt). I'm pleased with how it works with both the drunkard's path prints and the dense horizontal quilting.


The back is everyone's favorite Ikea number script print. Munchkin was a good sport taking photos all over town on this beautiful San Francisco day.


The finished size is 44" x 45". I love the play between the looseness of the improv piecing of the prints, and the precision of the circles and the horizontal quilting.