30 October 2011

Generation Q

The folks at Generation Q magazine have been very kind to me over the past couple days. First they selected the Green Stag as one of their favorites from the Pacific International Quilt Festival.
And yesterday they named my Ripple Quilt their quilt of the week.

Generation Q sprang up a few months ago following the closure of Quilter's Home magazine. Several of the magazine's editorial staffers started the web magazine. I've especially enjoyed their profiles of creative people driving the modern quilting movement. Check it out!

19 October 2011

Pear blossom finished

The Pear Blossom blanket is quilted, bound, washed and done.


The washed size is 66" square. The fabrics are Pear Tree by Thomas Knauer for Andover (all 21 prints), Kona Bone and Flamingo. I shared some piecing and process photos a few weeks ago.


I assembled this as a quilt-as-you-go project following Marianne's tutorials at The Quilting Edge for joining the blocks with the center sashing and adding borders with the outer sashing and cream border. The instructions were easy to follow and worked quite well. I diverged at the very end of the instructions for joining the blocks, hand stitching the double-fold top sashing with an invisible ladder stitch instead of top stitching. I didn't like the way that top stitch was going to look with the quilting I had planned.


Originally, I had envisioned the outer pink sashing as a thicker border, but when I attached the 6" Flamingo frame it was clearly too much. I trimmed it down to 3" to match the inner sashing. I had joked about hating borders, except for my current project, which has two. I don't think I can call that sashing a border any more, so I'm back to just one.


I quilted the medallions and sashing with the walking foot. The outer cream border is quilted with the same daisy chain I used around the medallions, only with pink thread instead of natural.


Each of the four medallions uses one of the fabric collection's large-scale prints in all three colorways. I don't usually work with a lot of big prints, but I had a great time with these. I think the strong color hierarchy in each print made it easier to wrap my head around it.


The label is hand stitched on the back border.

17 October 2011

Oops, another pillow

I mucked up one of the four quilt-as-you-go blocks for my Pear Blossom quilt. When it came time to join the blocks, I trimmed one too small. Rather than pare down all the others, I remade the pinwheel block.


But I still had a beautiful quilted medallion block. Just a bit too small for my quilt.


So I trimmed the block a little more, whipped up a creamy zippered pillow back, and finished the pillow with binding scraps from Pear Blossom and Pink Hero.


Bonus pillow!

The pillow finishes at 18" square from my original design and pattern. The fabric is Pear Tree by Thomas Knauer for Andover.

BWS tips button


04 October 2011

Ripple quilt

I'm finally ready to stamp the Ripple quilt "finished."
It began in the spring when Robert Kaufman Fabrics distributed solids charm packs to the quilt guild and challenged us to make quilts using only solids. About the same time Accuquilt sent a fabric cutter to try out. As it turns out, working together solids from all (dusty) shades of the rainbow, and block-based quilt design are both outside my comfort zone, so I decided to wrap it up into one challenge.
I cut a quarter circle and a corner from each charm (5") square, then an equal number from various off-white solids. I wrote a tutorial for assembling the drunkard's path blocks in Die Cut Drunk and described how I arranged the blocks in Drunken Progress.
The quilting uses several different colors, with all of the concentric circles around any drop in the same color. The colors are light blue, light ochre, moss green, deep red, and white.
The drops overlap in different amounts. Some drops have more rings than others. Some of the quilted drops are set completely in the white background, with no drunkard's path blocks.
I quilted the circles using the walking foot. I hadn't really thought through the amount of turning required to quilt all these circles on my little machine. In the future I wouldn't try this on anything as big as this 61" x 69" quilt.
The back is Kona Snow with a stripe of natural Kaufman Chambray and a pieced circle.
the label is embroidered at the center on one of the quilting drops. I'm so happy with how the quilting turned out, both front and back.

UPDATE: If you're interested in making a drunkard's path quilt, Kate and Kristie are hosting a quilt along over at Needle and Spatula and OCD.

03 October 2011

Labels

I've undertaken a project to get labels on all my quilts. I've been putting it off because I hadn't settled on a labeling strategy. I have no interest in using a permanent marker on my quilts -- it just wouldn't feel right to me. I've seen a few stamping solutions that seem elegant and workable, and I may end up going that way one day.
But for now I've decided to bite the bullet and embroider the labels. I've been very satisfied with the several embroidered labels I've made before. I'm sending the Green Stag quilt to hang at the Pacific International Quilt Festival later this month, so I figured it was high time to get on top of the label backlog. Now it just needs a sleeve and it will be ready to go.

Next up was the geometric Green Windows baby quilt I mad in the spring.
Then the Shazam lightening zig-zag quilt that's finally ready to send off to the BASICS quilt gather.
Next my Modern Quilt Guild Habitat challenge entry, now titled In One Way.
And Finally a little Halloween quilt I made in my stencil quilt class. Can you tell it's spooky?

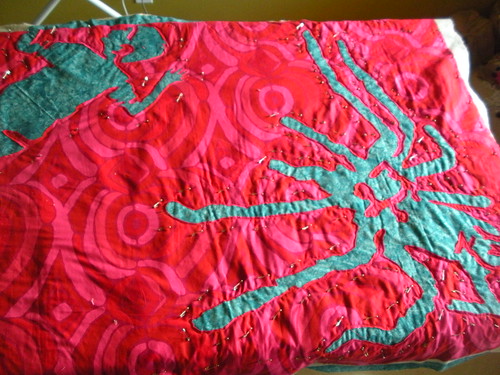
But wait ,there's more. I realize I haven't done a proper post on my finished Ripple quilt. I promise I'll get to that soon. For now here's a shot of the label I stitched into the backing just before I quilted this corner of the blanket. Then I centered one of the drops around the label.
As for the sewn-on labels, you might have guessed that I love that blanket stitch around the edges. I wish I had figured out how to get a clean stitch at the corners of the rectangles before the very last stinking corner. You can see how the part of the stitch that's supposed to sit along the side of the label pulls up over the edges at many or the corners.

The solution I came up with was to have a small diagonal stitch in the corner (so if the blanket stitches are 1/8", the diagonal stitch comes into the label only 1/16"), turn the corner, then take a small backstitch in the backing material, catching only 2 or 3 threads. Now proceed along the new side. I'm sure many of you more experienced stitchers have already solved this problem, perhaps in more elegant ways.


02 October 2011

Watch out for Lauren

And yes, I'm addressing her small children. Check out the amazing work she did in my stencil quilt class. Hardcore!

DSCN2273