27 June 2011

Go! Baby Winner

Thanks to everyone who entered the Go!Baby giveaway. I read every post, and I loved seeing the huge variety of projects everyone is working on. We're a busy bunch. And it was great hearing from so many new people -- I hope I can keep you interested!

Now to the big news...

Random.org fed me winning number 119. And the lucky winner is Ellen, who wrote:
Right now, I'm working on a firework quilt for my daughter's first Fourth of July!! :) Thanks for the giveaway!!! :)
Congratulations Ellen! Have a great Fourth of July with your baby girl!

24 June 2011

Drunken progress

Well, I'm not going to win any prizes for precision on this project, but I've finished sewing up my drunkard's path units from the the Kaufman Kona charm pack.


Upon measuring, I found some of the pieces to be short along the square (no seam) sides. This happened because the fabric slipped or stretched during cutting. Accuquilt recommends you alight the long grain of the fabric with the die because that is the least stretchy. I wasn't careful about figuring out the grain directions of the solid charm squares -- what a pain, right? --but it seems I should have. Anyway, there is going to be a fair amount of "easing" to line up the units.


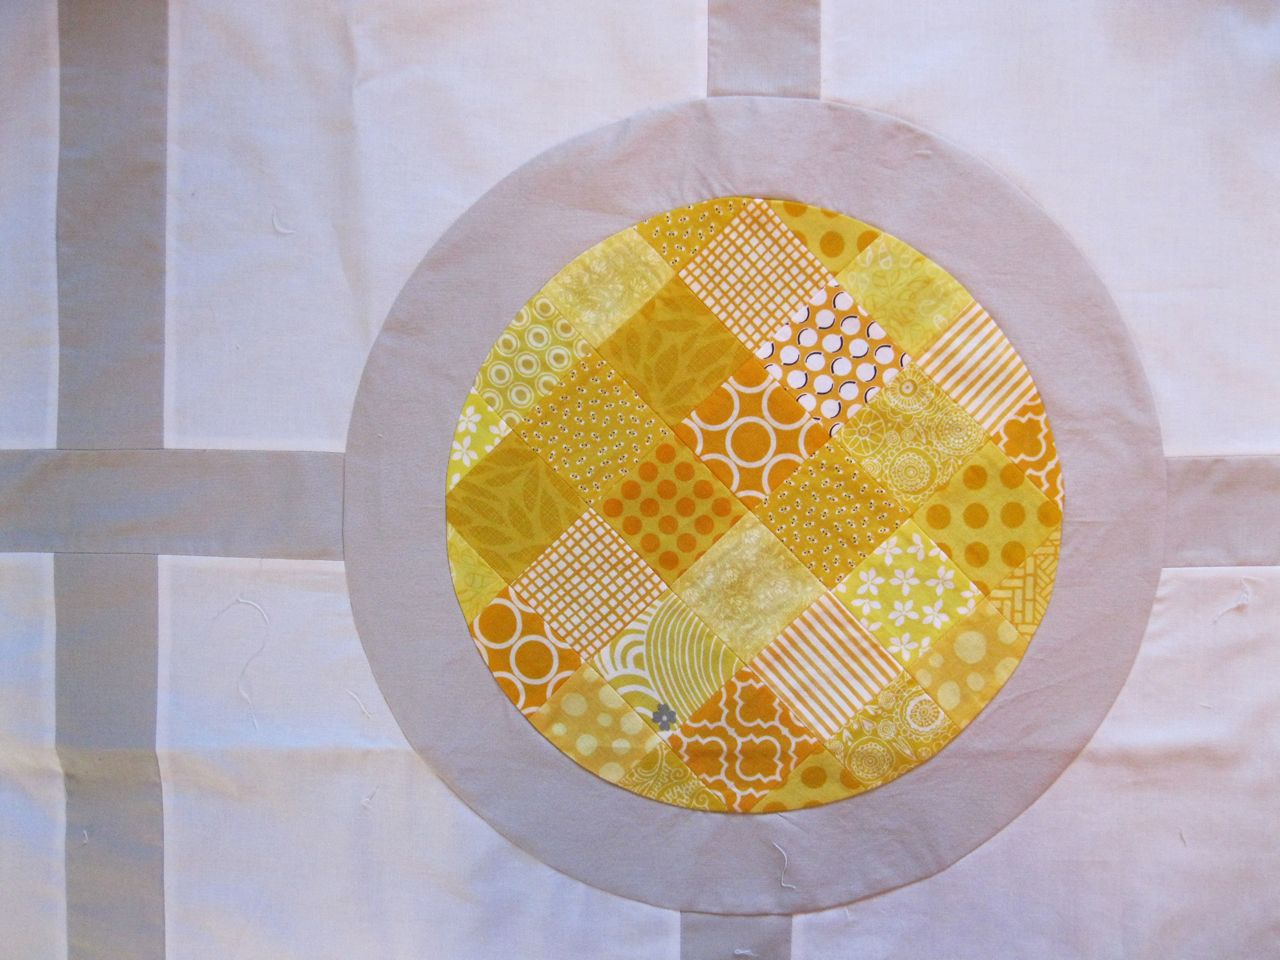
I tried several layout options, and wasn't pleased with any symmetrical tile patterns. The colors don't have a lot of umph, and it just came off a bit sleepy. I ended up separating the units into colored  centers and neutral centers, then each of those into 8 piles by hue. Finally, I paired hues to make 8 block groups. For the neutral centers the groups are:

  • blue and gold
  • green and brown
  • olive and tan
  • red and purple

Then I arranged the units around a central circle, filling with additional Kona snow as necessary.


Some of the blocks don't have a solid circle in the middle.


And some are larger than 4x4. But now I've run out of snow, so this will have to wait for a few days.

If you haven't signed up yet, my Go!Baby giveaway is still open. Hurry for your chance to win a fabric cutter and 3 dies!

22 June 2011

Accuquilt Go! Baby Giveaway


The lovely people at Accuquilt have given me the go-ahead to announce my Go! Baby giveaway! This is a sponsored giveaway for a Go! Baby fabric cutter and 3 cutting dies of your choice.

You have four chances to win (Leave a comment for each entry):

1. Tell me what you're working on.
2. Follow me on Blogger or in your reader.
3. Like me on Facebook or follow me on Twitter
4. Tweet the giveaway (include @dsrouse and a link to this post). Cut and paste if you're lazy:

  • There's an Accuquilt GO!Baby fabric cutter #giveaway at @dsrouse: http://pieceandpress.blogspot.com

Leave one (and only one!) comment for each entry.

A valid email address is required to win. I'm pretty resourceful, but if your comments arrive with a no-reply email address, and I can't find your blog in your Blogger profile, and you're not my BFF, you can't win!

Giveaway closes Sunday, June 26, 2011 at 10pm PST. Winner announced Monday, June 27. Good luck!

21 June 2011

Die cut drunk

The nice folks at Accuquilt sent me a Go! Baby fabric cutter to try out, and promised a second Go! Baby to give away to one of my lovely readers. I started this blog just shy of a year ago, and this generous offering from Accuquilt marks both my first blog swag and my first giveaway.


Anyway, my Go cutter arrived a week ago along with three dies: hexagons, triangles and drunkard's path. I chose those dies because they seemed to give the most advantage over rotary cutting with rulers and templates. For strips an squares I feel the bulk of the effort comes in folding and truing the fabric. But angles and curves are much more difficult than running a rotary blade along a ruler. I'm going to tell you about my experience with the drunkard's path cutter.

14 June 2011

Over at Spincushion

Leigh Ann at Spincushion has paired my Mod Wheels Baby Quilt with a vintage mod record cover. What a blast to see it in my reader this morning.

I started following her blog a couple weeks ago. She takes fabric prints, finished quilts and other textiles and matches them with images from other design disciplines. It is really delightful, and you should check it out.

13 June 2011

Just a little late for Harvey Milk Day


I finished my first portrait quilt this weekend. In celebration of Lesbian, Gay, Bisexual, and Transgender Pride Month, it's a portrait of Harvey Milk. I'm not much for big street festivals, as large crowds tend to make me anxious, but I can quilt!


I used a Denyse Schmidt small red check print on the back...


with five Marianne stripes across the width.


The design is based on the famous photograph by Daniel Nicoletta of Harvey Milk standing in front of his Castro Street photo shop. Dan graciously allowed me to use his image for my piece.

Harvey Milk. Photo by permission of Daniel Nicoletta

When I contacted Dan he told me that Elva Smith, the mother Scott Smith (played by James Franco in the film), was a dear friend and avid quilter until her death about a year ago. It was another reminder of progress and continuity. There is a famous refrain among quilters that nothing is ever new in quilting -- in the long history of the art, someone has done it before. While I strive in my work to be inventive and original, I am mindful of the work and creativity of those who came before me. Similarly, this time of year I remember the gay rights pioneers who came before, who fought, sacrificed and sometimes died to make the world a better place for all of us.

10 June 2011

Ready to sandwich a new stencil quilt


My next stencil quilt will have a pink, orange and gold applique. The patchwork is triangle-ish, and the stencil will be big.


It was another cut, sew, recut and repeat process, with the final two cuts in 4 inch strips and points aligned. It lends a hint of order to the chaos. The strips of solid orange and pink will not be visible in the finished quilt. (Well, maybe the tiniest corner... we'll see.)


And here's the background for the stencil: the red bricks I posted  the other day. Seeing the two pieces together you may have noted that I'm not going for subtlety here.

I'm going to try something different this time. For the other three I completed the reverse applique of the stencil before sandwiching the quilt. This time I'm going to do the quilting and applique at the same time, then cut out the background pieces around the stencil. I'll let you know how it goes.

I love the energy of the shattered triangles and the richness of the reds. I may have to come back and make each pattern into its own quilt after I'm done cutting this one up!

08 June 2011

Fruit on the vine

Warning: This post is completely off topic -- no quilts!

I spotted the first tomatoes on one of my tomato plants this evening.

I'm trying a new growing method this year. Last year I planted tomatoes in the only patch of dirt available to me, but there wasn't enough sun. In much of the San Francisco Bay Area, summer is foggy and cool and autumn is sunny and hot. So when the sun was high in July, theoretically able to reach marginal garden areas, Oakland tomato vines still shivered and waited for warmer days. By the time it warmed up in September (in truth even autumn wasn't very warm), there wasn't enough sun in the garden. So, a disappointing tomato crop last year.


But I'm trying a new strategy this year.


I'm growing tomatoes upside down on my south facing balcony. I rooted two plants in 5-gallon buckets hung from the rafters. The buckets have small holes cut in the bottom, with a few extra drain holes drilled around the bottom edge. The plants have grown vigorously since I transplanted the small starts a month ago into organic potting mix.

This spot is under an eave, so it will get less than ideal sun for the next month or so. But by the time it warms up around here the sun will be lower and the plants will get sun better than half the day, just in time to ripen up all that green fruit.

01 June 2011

WIP Wednesday

If you've been following the blog you may be getting the sense that I've never met a pieced circle I didn't like. Lately I've been working on a new design, piecing lots of patchwork circles into a solid grid.


I've sewn 18 yellow circles into squares of kona ash. The yellow circles are 11" finished diameter.


Now I'm trimming the gray squares... 


into 15.5" circles.


And placing the circles at the intersections of a solid background grid.


I measure a 14.5" circle on the backround.


And cut around the template.


Then I pin the yellow piece into the background. I mark 8 compass points in the seam allowance on both pieces, pin at the 8 points, pin to secure the sashing seams in the background, and then pin 2 more times between each of the 8 compass points. I think that's 32 pins.

The hilarious and fearless Lynne at Lily's Quilts recently wrote a great tutorial for piecing circles. It's very close to the method I had been using, but she convinced me to use more pins. You can believe me when I say I hate pinning, but it's worth it.


Sew and press the seams to the inside to form a 15" finished circle. (this photo is a different block, because I don't have it in me to sew another circle right now!)

This 74"x74" quilt top has 12 full circles and 12 half-circles along the edges. I've completed 1 full circle and 3 halves. Although I am getting better at it, it does take a lot of time and concentration.